November 21, 2014, 9:01 pm
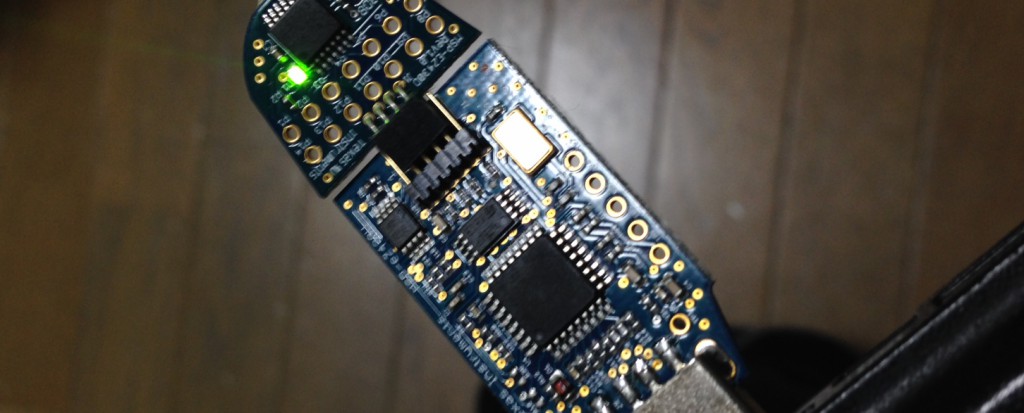
Notes below are for debian wheezy:
apt-get install gcc-msp430 mspdebug
wget http://41j.com/blog/wp-content/uploads/2014/11/ti_3410.fw
sudo cp ti_3410.fw /lib/firmware/

#compile code and program device
wget http://41j.com/blog/wp-content/uploads/2014/11/myprog.c
msp430-gcc -Os -Wall -mmcu=msp430f2013 -std=gnu99 ./myprog.c -o myprog
sudo mspdebug uif -d /dev/ttyUSB0 'prog ./myprog'
notes
Useful information here on where to find firmware:
msp430 firmware
I’ve used the following makefile in the past with some success: download
This is the code I used for the test above:
#include <msp430x20x3.h>
int main (void) {
  WDTCTL = WDTPW | WDTHOLD;

  P1DIR = 0xFF;
  for(;;) {
    P1OUT=0;
    __delay_cycles(2500000);
    P1OUT=1;
    __delay_cycles(2500000);
  }
return 0;
}
Category:
Uncategorized |
Comments Off on MSP430 Development on Linux using the eZ430-F2013
November 21, 2014, 1:38 am
Some more random CCD notes, as I’ve been trying to figure out how the Ixy 60 CCd works..
The reference here which describes CCD interfacing in general has been very useful.
Typically a the CCD is interfaced using an AFE (analogue front end). Another camera I have uses this Casio part: AD9923, Datasheet.
This post has some notes in Russian on the Ixy 60. No idea what they’re doing but the drawings look awesome.
These youtube videos give a nice introduction to CCD.
Further random notes on the Ixy 60 CCD pinout
Pins 3 and 4 from bottom left appear to show differences with light when removed from circuit (pins 17 and 18 on my diagram). Analogue data.
CCD looks similar to MN39670 but I can’t find a datasheet for this anyway.
6,8,5,4 on flex PCB appear to be pixel clock?
On CCD
Possible pixel clocks
———————
pin 28: pixel clock? ~30ns period 33MHz? ~3v
pin 17: 30ns pulse ~4v
pin 18: 30ns sq. ~3 -> 4v
pin 19: as 18
pin 27: as 28
pin 1: 3us, 16v sq every 30ms. (inside 2 10us -8v sqs)
2.2us, 0-5.8us, 4.6us, -8v. every 124.8us
pin 3: as pin 1, but no +16v pulses.
pin 4: as pin 1, but 16v is in 2.4us sqs.
pin 5: as 4, but no pulse before 16v
pin 6: +10v, 20us, 0 5us, 16us
pin 7: -8, every 125us, + something…
pin 8: as 7
pin 9: as 7
pin 10: +8v, 20us, 0-4.4us, 14.4us. every ???
2.6us, 0-7.8us, 2.6us. every 125us
pin 11: as 7?
pin 12: as 10
pin 13: as 12
pin 14: as 12
November 19, 2014, 6:30 pm
Continuing on from my previous post on the Canon Ixy 60, I’ve been playing around a bit more and seem to have got some data out. Some rambling in the following video:
I also tried throwing some data into the camera and seeing if it would show up on the camera LCD in the following video:
The code used in the video on the USRP is as follows. Next set is to build this out a bit and see if I can decode some image data:
#include <uhd/types/tune_request.hpp>
#include <uhd/utils/thread_priority.hpp>
#include <uhd/utils/safe_main.hpp>
#include <uhd/usrp/multi_usrp.hpp>
#include <uhd/exception.hpp>
#include <iostream>
#include <fstream>
#include <csignal>
#include <complex>

using namespace std;

int UHD_SAFE_MAIN(int argc, char *argv[]){
    uhd::set_thread_priority_safe();

    uhd::usrp::multi_usrp::sptr usrp = uhd::usrp::multi_usrp::make(string(""));

    usrp->set_clock_source("internal"); // set clock

    //always select the subdevice first, the channel mapping affects the other settings
    usrp->set_rx_subdev_spec(string("A:A"));

    std::cout << "Using Device: " << usrp->get_pp_string() << std::endl;
    double rate = 1000000; // trying 1MSPS
    usrp->set_rx_rate(rate);

    //set the center frequency
    double freq=0;
    uhd::tune_request_t tune_request(freq);
    usrp->set_rx_freq(tune_request);

    //usrp->set_rx_gain(5);
    //usrp->set_rx_bandwidth(100);

//    ant = "";
//    usrp->set_rx_antenna(ant);

//   cout << usrp->get_mboard_sensor("lo_locked", 0).to_bool() << endl;

    sleep(1);

/////////////// RECEIVE CODE

    //create a receive streamer
    uhd::stream_args_t stream_args("sc16","");
    uhd::rx_streamer::sptr rx_stream = usrp->get_rx_stream(stream_args);

    uhd::rx_metadata_t md;
    std::vector<std::complex<short> > buffer(1000000);

    //setup streaming
    uhd::stream_cmd_t stream_cmd(uhd::stream_cmd_t::STREAM_MODE_START_CONTINUOUS);
    stream_cmd.num_samps = 0;
    stream_cmd.stream_now = true;
    stream_cmd.time_spec = uhd::time_spec_t();
    rx_stream->issue_stream_cmd(stream_cmd);

    for(;;) {

        size_t num_rx_samps = rx_stream->recv(&buffer.front(), buffer.size(), md, 3.0, false);

        if (md.error_code == uhd::rx_metadata_t::ERROR_CODE_TIMEOUT) { cerr << "timeout"  << endl; }
        if (md.error_code == uhd::rx_metadata_t::ERROR_CODE_OVERFLOW){ cerr << "overflow" << endl; }
        if (md.error_code != uhd::rx_metadata_t::ERROR_CODE_NONE)    { cerr <<  md.strerror() << endl; }

/*
        double avg=0; double samps=0;
        for(int n=0;n<1000;n++) {
          if(n>0) avg -= avg/samps;
          avg += buffer[n].real()/(samps+1);
          samps++;
        }
*/
        cout << avg << endl;
  //      cout << "data size: " << num_rx_samps << " first: " << (&buffer.front())[0] << endl;
    }

    // Will never get here
    stream_cmd.stream_mode = uhd::stream_cmd_t::STREAM_MODE_STOP_CONTINUOUS;
    rx_stream->issue_stream_cmd(stream_cmd);
}
Category:
Uncategorized |
Comments Off on Canon Ixy 60 CCD experiments Part 2
November 18, 2014, 9:55 am
I was pretty impressed by how easy it was to get Nginx to work as a caching reverse proxy. I run a slightly odd configuration where my host throws out ssh tunnels to an EC2 instance, this then feeds into Cloudflare for CDN.
I decided to put Nginx in the middle. While Cloudflare is good, it doesn’t really do much by way of aggressive caching and the SSH tunnels were still getting hit pretty hard. In the free Cloudflare plan you don’t get much control over this anyway.
So I switched up my tunnels and installed Nginx on the EC2 instance. Configured this as a reverse proxy and set reasonably aggressive caching. Config follows:
user www-data;
worker_processes 4;
pid /run/nginx.pid;

events {
	worker_connections 768;
	# multi_accept on;
}

http {

	##
	# Basic Settings
	##

	sendfile on;
	tcp_nopush on;
	tcp_nodelay on;
	keepalive_timeout 65;
	types_hash_max_size 2048;
	# server_tokens off;

	# server_names_hash_bucket_size 64;
	# server_name_in_redirect off;

	include /etc/nginx/mime.types;
	default_type application/octet-stream;

	##
	# Logging Settings
	##

	access_log /var/log/nginx/access.log;
	error_log /var/log/nginx/error.log;

	##
	# Gzip Settings
	##

	gzip on;
	gzip_disable "msie6";
	proxy_cache_path /data/nginx/cache keys_zone=one:10m;

	server {
		listen 80;
		proxy_cache one;
		proxy_cache_min_uses 100;
		proxy_cache_valid 200 302 30m;
		proxy_cache_valid 404      1m;
		    proxy_set_header Host $host;
		location / {
            		proxy_pass http://localhost:8090;
        	}
    	}
}
Category:
Uncategorized |
Comments Off on Nginx caching reverse proxy configuration
 RSS
RSS