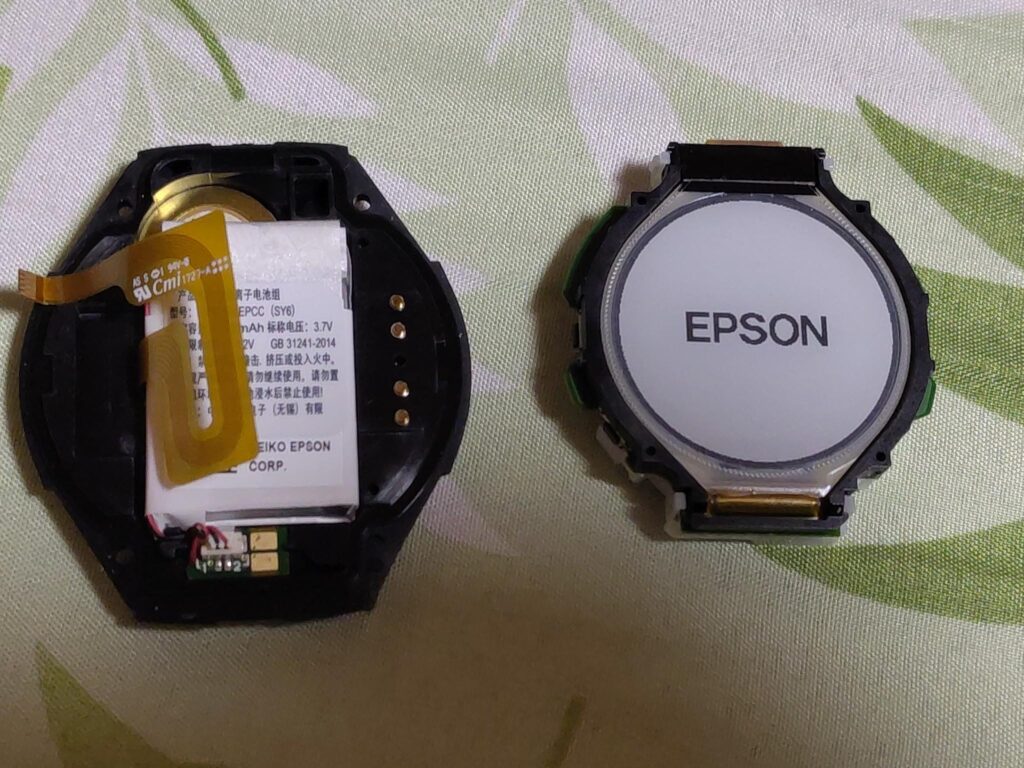
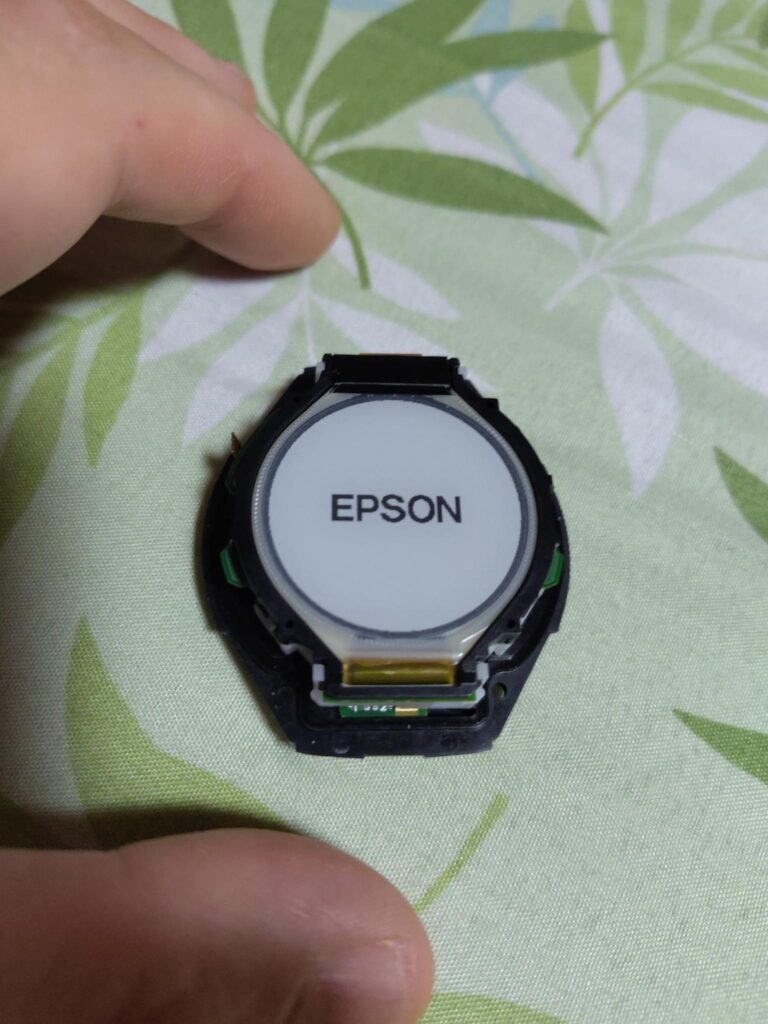
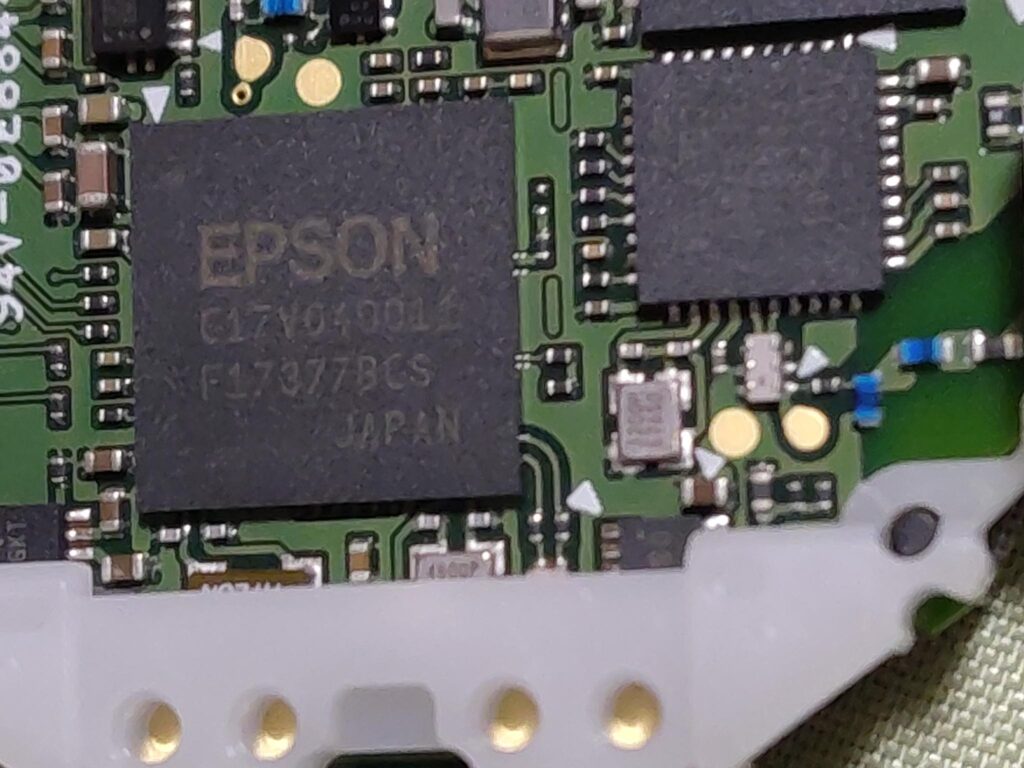
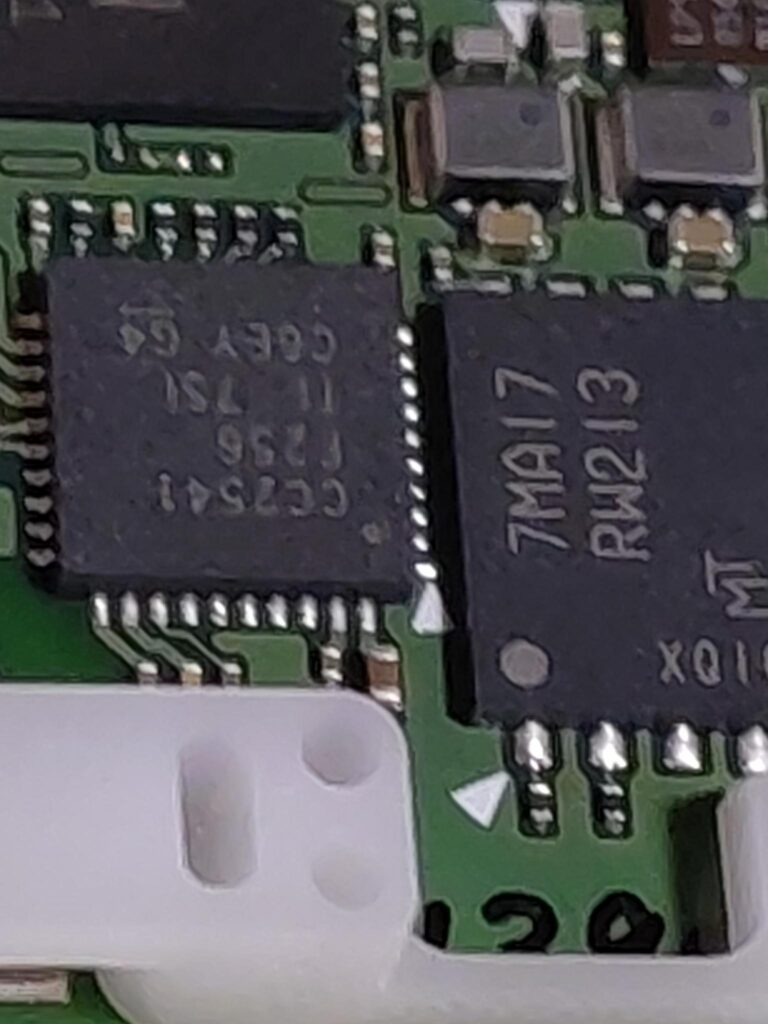
Epson J300 GPS Watch Disassembly

C17V04001, F17377BCS

CC7541

7MA17, RM213

Display appears to be ET011TJ1

INHECO 96 Chick Brooder

Overview

The Inheco Control 96 is an OEM unit built around a Watlow Series 96 PID controller and a Watlow LSTW driver module, housed in an Inheco-branded chassis. Originally designed for TEC/Peltier temperature control in laboratory equipment (e.g. the Inheco CPAC Ultraflat for heating Eppendorf tubes), it can be repurposed as a general-purpose temperature controller.

This writeup documents repurposing one such unit to drive a Kotatsu heater element (~100V rated, operated at 30–40V) as a brooder heater for day-old chicks. The unit was acquired second-hand and arrived with a PIC microcontroller attached to the RS232 port and the controller in a misconfigured/locked state.

Reference also: 41j.com Inheco Control 96 Notes — confirms the LSTW is an undocumented OEM module, likely an H-bridge in the original TEC application, but in single-output configurations acts as a simple DC power switch.


Hardware

Watlow Series 96 PID Controller

  • 1/16 DIN panel mount PID controller
  • Universal input (thermocouple, RTD, process)
  • 4 outputs (configuration dependent on model)
  • RS232 serial communications on output 4 terminals (19, 20, 21)
  • Keys: ▲ Up▼ Down∞ Home/Infinity↺ Advance/Cycle
  • Firmware version on this unit: r7dL (visible in DIAG menu)

Watlow LSTW 1.5 Driver Module

  • Undocumented OEM module, not available on Watlow website
  • 8-terminal connector block
  • Functions as a DC power switch (not a true SSR)
  • Contains an IRF5305 P-channel MOSFET (55V, 31A rated) as the main switching element
  • Protection diode across input: originally B13 Schottky (30V, 1A — undersized)
  • Status LEDs: GRUN (green) = control input active, ROT (red) = output switching on

LSTW Terminal Pinout (as determined empirically)

PinsFunction
1–2Unknown / unused in this config
3–4Output to load (heater)
5–6Control input from Watlow 96 (24V DC signal)
7–8Connected to Watlow 96 rear center terminals (power/common)

The LSTW passes the supply voltage through to the load when the control signal is active — it does not have a separate mains input. Supply voltage = output voltage.

Kotatsu Heater Element

  • Rated 100V AC
  • Operated at 30–40V DC (sufficient for brooding temperatures)
  • Connected to LSTW output terminals 3–4

Thermocouple

  • Type J (blue/red wire, European IEC colour code)
  • Connected to Watlow 96 Input 1 terminals
  • Polarity sensitive — blue wire to negative terminal


Watlow Series 96 — Key Navigation

ActionKey Sequence
Home PagePress  briefly
Operations PagePress ▲ + ▼ together (~3 sec)
Factory PageHold ∞ + ↺ together for 6 seconds
Setup PageHold ▲ + ▼ together for 6 seconds
Enter a menuPress 
Change value / 
Confirm valuePress 

Some config settings appeared to be locked out at first. I’m not sure if I was just misunderstanding the config system or if I actually fixed this. There was a PIC connected to the RS232 input on the Watlow 96, this seemed to be processing a signal from a knob on the front of the unit. I disconnected this.


Configuring the Thermocouple Type

Accessing CIN1 (Calibration Input 1 Menu)

  1. Enter Config Page: hold  ▲+▼ for 6 seconds (it changes to one menu after 3s then again)
  2. Press  to navigate to CIN1
  3. Press  to enter
  4. Set the thermo couple type to H to K-type and J for J-type.

LSTW Diode Failure and Repair

What Happened

When attempting to supply ~40V DC to the LSTW input (to drive the Kotatsu heater at sufficient power), the protection diode B13 failed with visible smoke.

Root Cause

The B13 is a 30V, 1A Schottky diode — it is connected across the input terminals as a flyback/protection diode. Supplying 40V exceeded its 30V rating, causing it to fail.

The main switching MOSFET (IRF5305, P-channel, 55V/31A, TO-220 package) survived.

Repair

The blown B13 was removed. Unit was tested without it — functional short-term since the MOSFET is not switching at high frequency in this application, so flyback spikes are minimal.

Replacement diode found by scavenging: A D2S58 Schottky diode was recovered from scrap PCB.

D2S58 specifications: 80V, 2A — significantly better rating than the original B13 and well suited for this application.

Installation: Cathode (stripe) to positive input terminal. Solder across input terminals in same orientation as original B13.

The D2S58 replacement is an improvement over the original B13. If sourcing a new part, any Schottky diode rated ≥50V, ≥1A is suitable (e.g. 1N5819 at 40V is marginal; prefer SS34, 1N5822, or similar at 40V+).


Final Working Configuration

ParameterValue
Thermocouple typeJ type (J in CIN1)
Thermocouple wiringBlue = negative, Red = positive
LSTW control signal24V DC from Watlow 96 Output 1 (terminals top 3-pin block)
Supply voltage to LSTW~40V DC (Rigol DP832)
HeaterKotatsu element, connected to LSTW output terminals 3–4
LSTW protection diodeD2S58 (scrap), across input, cathode to positive
SetpointSet to desired brooding temperature (e.g. 35°C for day-old chicks)

Operational Notes

  • The GRUN LED on the LSTW indicates the 24V control signal is present and active
  • The ROT LED indicates the output is switching (heater powered)
  • If ROT is lit but no heat: check supply voltage is connected to LSTW and heater is connected to output terminals 3–4
  • ERR4 on the Watlow 96 = open sensor (thermocouple disconnected or broken) — check wiring at terminals 5, 6, 7
  • The controller PID will modulate output to maintain setpoint — allow time for auto-tuning to stabilise temperature control
  • A few degrees offset between reading and actual is normal with replacement thermocouples — a calibration offset can be added in the IN1 menu if accessible

M7 Wifi Camera Notes

I picked up a cheap Wifi security camera on Amazon, it uses a mobile app called “seeing”. Which appears to be that referenced at seeing.store.

No ports were open when scanned with nmap. Monitoring traffic on the router indicated it was talking to a remote server (appears to be on Alibaba’s cloud service):

traffic when streaming video: 
18:19:21.995059 IP 192.168.8.191.36198 > 47.79.82.123.443: Flags [F.], seq 228080, ack 6579, win 6169, length 0
18:19:21.998765 IP 47.79.82.123.443 > 192.168.8.191.36198: Flags [F.], seq 6579, ack 228080, win 831, length 0
18:19:22.671581 IP 192.168.8.191.36200 > 47.79.82.123.443: Flags [S], seq 4002814628, win 29200, options [mss 1460,sackOK,TS val 4294938745 ecr 0,nop,wscale 3], length 0

With some more fiddling it appears that the cloud service coordinates with the phone/camera but if they are on the same network the camera will stream directly to the phone:

8:52:29.753976 IP navas-iPhone.lan.49936 > 192.168.8.191.10666: UDP, length 48
...
18:52:29.841608 IP 192.168.8.191.10666 > navas-iPhone.lan.49936: UDP, length 1332
18:52:29.841943 IP 192.168.8.191.10666 > navas-iPhone.lan.49936: UDP, length 1332

Whatever communication the phone coordinates via the cloud appears to open up a UDP port on the camera. It first sends a packet with a payload of “dummy”:

Which the camera seems to echo back:

The phone then sends a more complex binary payload:

The camera then replies with some clear text:

The phone sends some more binary data to setup the stream… I was able to replay the initial packet from a PC and receive the clear text reply. But this only works if the port has been opened via the phone first.

With no clear routes into the camera via the network I pulled it apart. The camera uses a AllWinner IP Camera SoC. I tried probing all the pads labelled RX/TX for a serial interface but didn’t have any luck here.

So, dumped the flash next.

Via a raspberry pi using: sudo flashrom -p linux_spi:dev=/dev/spidev0.0,spispeed=500K -r m7_firmware.bin

The camera appears to use an OpenWRT fork called Tina Linux. eGON header found at beginning of flash, indicating use of Allwinner’s built-in BROM and SPL bootloader. Bootargs suggest a serial console should be present.. so some more hunting may reveal it.

That’s all for now!

More notes.

The pins on the top right of the board above labeled W-RX0 etc. show an interface which responds only during boot, here is some sample output:

[74648][D]PACKET_CMD_USER_DATA 5a 51 0 0 64 d2 66 24
[74649][D]PACKET_CMD_USER_DATA 5a 51 0 0 64 d2 66 24
[74724][D]ecd.poweron_qrcode 0, ecd.ring_power_off_valid_count 0
[75051][I]GET_WIFI_DATA(3) len: 9 1
[75052][I]GET_NET_INFO(25) len: 8 0
$>Welcome to Wlan Bluetooth Console Tools ......
$>[75202][D]PACKET_CMD_USER_DATA 5a 51 0 0 64 d2 66 24
[75202][I]GET_SOME_DATA(7) len: 8 0
[75724][D]ecd.poweron_qrcode 0, ecd.ring_power_off_valid_count 0
[75724][I][W0] wifi: 0 81 0 | 335 137, 0(0/0/0), 0(0/0/0) | 403 0 135 112002 1042001100 | 127320 67068 60252
[UMAC WARN] sta_add():360, scan entry >= 10, discard rssi lowest one
[UMAC WARN] sta_add():360, scan entry >= 10, discard rssi lowest one
[UMAC WARN] sta_add():360, scan entry >= 10, discard rssi lowest one
[76715][D]PACKET_CMD_USER_DATA 5a 51 0 0 64 d2 66 24
[76715][I]GET_WIFI_DATA(3) len: 9 1
[76724][D]ecd.poweron_qrcode 0, ecd.ring_power_off_valid_count 0
[76724][I][W0] wifi: 0 81 0 | 169 33, 0(0/0/0), 0(0/0/0) | 403 0 135 112002 1042001100 | 127320 67716 59604
[76733][D]PACKET_CMD_USER_DATA 5a 51 0 0 64 d2 66 24
[76738][I]GET_SOME_DATA(7) len: 8 0
[net INF] msg <wlan scan success>
[76888][D]NET_CTRL_MSG_WLAN_SCAN_SUCCESS
en1: Trying to associate with 94:83:c4:6c:98:2c (SSID='youanji1' freq=2412 MHz)
en1: Associated with 94:83:c4:6c:98:2c
en1: Clear keys to send no encrypt 4 of 4-way handshake
en1: WPA: Key negotiation completed with 94:83:c4:6c:98:2c [PTK=CCMP GTK=CCMP]
en1: CTRL-EVENT-CONNECTED - Connection to 94:83:c4:6c:98:2c completed [id=0 id_str=]
[net INF] msg <wlan connected>
[net INF] netif is link up
[net INF] start DHCP...
[77267][D]============= dhcp =============
[77269][D]ip:0.0.0.0
[77271][D]netmask: 0.0.0.0
[77274][D]gateway: 0.0.0.0
[77276][D]dns[0]: 0.0.0.0
[77279][D]dns[1]: 0.0.0.0
[77281][D]dns[2]: 0.0.0.0
[77283][D]dns[3]: 0.0.0.0
[77286][D]invalid ip
[77288][D]NET_CTRL_MSG_WLAN_CONNECTED
[77724][D]ecd.poweron_qrcode 0, ecd.ring_power_off_valid_count 0
[77724][I][W0] wifi: 0 81 0 | 182 48, 0(0/0/0), 98(1/0/0) | 403 0 135 112002 1042001100 | 127320 71412 55908
[77746][D]PACKET_CMD_USER_DATA 5a 51 0 0 64 d2 66 24
[77746][I]GET_WIFI_DATA(3) len: 9 1
[77761][D]PACKET_CMD_USER_DATA 5a 51 0 0 64 d2 66 24
[77761][I]GET_SOME_DATA(7) len: 8 0
[net INF] netif (IPv4) is up
[net INF] address: 192.168.8.207
[net INF] gateway: 192.168.8.1
[net INF] netmask: 255.255.255.0
[net INF] msg <network up>
[78221][D]============= dhcp =============
[78224][D]ip:192.168.8.207
[78227][D]netmask: 255.255.255.0

More Lasertec C130 Notes

I’ve been playing around a bit more with the Lasertec microscope. Looking at the literature Lasertec microscopes are often described as “Semi-confocal” this explains the lack of a galvo or anything that I could see that would deflect the light in X and Y:

So I suspect that the silver box at the top of the unit is the AOD and the detect (which is after all marked “slit detector”) is a silt detector!

I decided to pull out the CCD:

And cram a different sensor into the vacated void:

This for taking epi-illuminated images, this works somewhat reasonably: