Archive for the ‘Uncategorized’ Category.

Keyence VE7800 PCB Pics

I couldn’t really resist taking a quick look inside the SEM. The instrument connects to the host PC over USB and firewire. These go to two separate boards inside the instrument. We removed the USB connection during operation and saw that images were still being acquired. It’s reasonable to assume that the firewire connection is used for image acquisition only, and that all control signals go over the USB connection. The USB device ID is 0720:1005.

Below are some quick snaps of the PCBs for reference.

photo 1

photo 2

photo 3

photo 4

photo 5

Keyence VE7800 Operating Procedure

  1. Turn on the keyence ve7800, the chamber should be closed, and have partial vacuum from the last time it was operated.
    turnon
  2. Turn on PC.
    turnon_pc
  3. Wait to vacuum light on the VE7800 to stop flashing. The vacuum light should be solid blue. This will take approximately 5 minutes.
    vacuum_ok
  4. Press and hold the “Vacuum on/off” button for 2 seconds.
    vacuum_button
  5. Wait ~45 seconds while the vacuum bleeds. During this process the air light should be illuminated.
    air_led
  6. Open the chamber using the handle DO NOT USE ANY OTHER FIXTURES
    open_cham
  7. Remove the specimen table (it is not fixed in place and can easy be removed)
    specimen_table
  8. Remove the stub (aluminum disc) the thumb screws should only be hand tight.
    tablescrew1

    alu_stub

  9. Replace the carbon tape if required (a roll should be in the SEM consumables box by the SEM).
    carbon_tape

  10. Firmly attach the sample to the aluminum stub. Ideally the conductive layer of the sample should make contact with the carbon tape.
    sample_set
  11. Place the aluminum stub in the sample table. Make should the top of the stub is level with the top of the table and use the thumb screws to screw the stub in place.
    table_sample

    tablescrew1

  12. Place the sample table in the device.
    sample_in_place
  13. Close the chamber use the handle, do not use other fixtures
    close_chamber
  14. Press and hold the “Vacuum on/off” button for 2 seconds.
    vacuum_button
  15. Start the ve-7800 software (the icon is on the desktop)
    sem_soft
  16. Select manual mode in the software (other modes require more Japanese language skills).
    sem_manual
  17. Wait for the blue vacuum light on the ve7800 to stop flashing.
  18. Click the “Beam on/off” toggle button in the application software
  19. beamon

  20. Select 50x magnification
    set_mag
  21. Press the “full auto” button.
    fullauto

  22. The following dialog will appear, wait for the parameter optimization process to complete. Full auto will attempt to algorithmically determine the optimal voltage,focus and contrast for the sample.
    fullauto_dialog
  23. Use the X and Y dial on the interface pad to move to a region of interest.
    sem_controlsXY

  24. When moving though the image, press “full auto” when the image quality appears poor.
  25. To increase magnification, either use the pulldown menu, or the dial on the rotary pad shown below.
    zoomdial
  26. During observation you may wish to rotate or tilt the sample. These operations can be performed directly using the knobs on the SEM.rotate_knob
    tilt
  27. See further instructions below or acquiring and saving a high resolution image

Shutdown procedure

  1. Click the top left button to turn off the beam. The imaging area will go dark and display the message shown below.
    beamon
    beam_off
  2. Press “vacuum on/off” on the ve7800 for approximately 2 seconds.
  3. Press and hold the “Vacuum on/off” button for 2 seconds.
    vacuum_button
  4. Wait 45 seconds for the vacuum to bleed.
  5. Open the sample chamber. only use the handle not the fixtures of knobs to open the chamber
  6. Remove the sample
  7. Close the chamber
  8. Press “vacuum on/off” for approximately 2 seconds. The vacuum light should start of blink. Wait until the vacuum light stops flashing and is illuminated solid blue.
  9. Turn off the ve7800.
    semoff

  10. Shutdown the software and turn off the PC

Saving an image

  1. One you have located a region where you like to acquire a high resolution image click the “take picture” button.take_pic
  2. You’ll need to wait approximately 1 minute for acquisition. The image will slowly appear on the screen during acquisition. Try not to knock the SEM, as vibration will cause more issues at this point.
    acquiring
  3. Select the album tab
    album_tab
  4. Select the image you just acquire and right click “copy” (コピー).
    image10
  5. Right click on the desktop or a USB drive and click “paste”:
    paste_file
  6. Click the manual tab to return to the main view:
    manual_tab

esp8266 and kr580vm80a image maps

esp8266_slip

I’ve been playing around with LeafletJS and decided to create slippy map versions of a couple of the Zeptobar IC image sets. They’re available here:


esp_sm
esp8266

kr_sm
kr580vm80a

Creating LeafletJS tile sets in golang

esp8266_slip

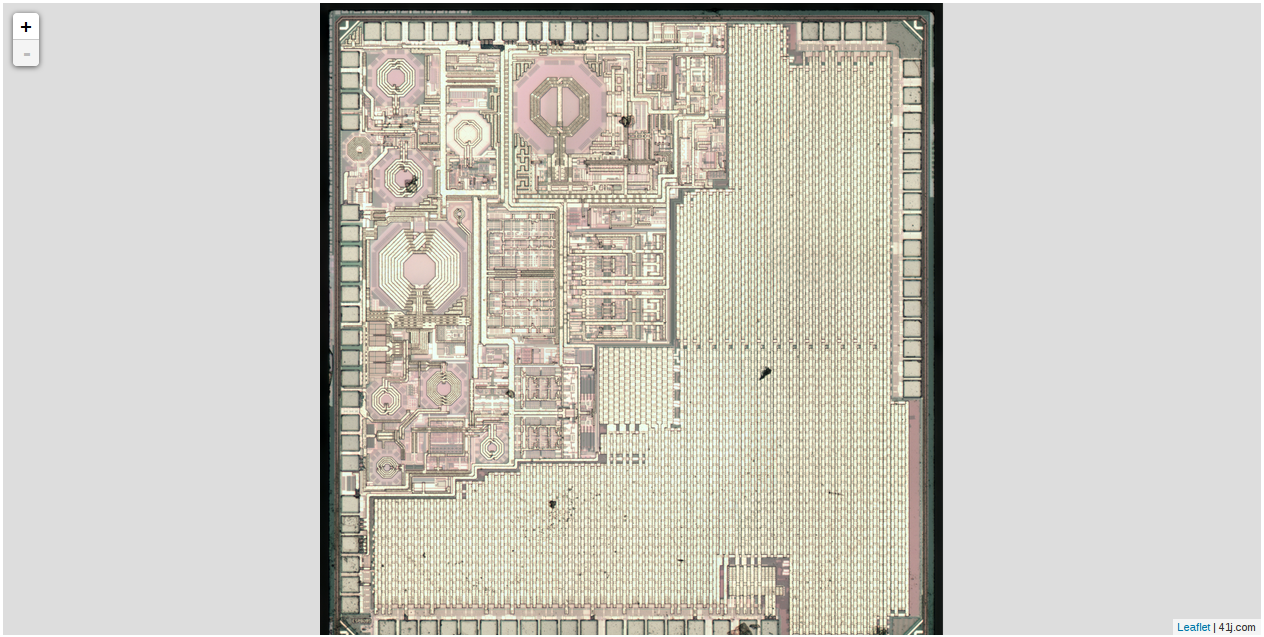
I wanted to create some slippy map style imageviewers using LeafletJS from large flat images files. In order to do this you need to break the image down into tiles of 256×256 pixels and various zoom levels. There are plenty of tools to do this, but none that looked like they quite fit my application. In anycase I figured it would be an interesting golang learning exercise. The code is available on github here. But it’s fairly simple and the sourcecode the shown below. It can be ran as:

split filename.png

And will spit out a directory called “tiles” which contains the tileset. The html file in the above github repository shows how LeafletJS might be used to view this tileset.

package main

import (
  "fmt"
  "image"
  "image/jpeg"
  "image/png"
  "image/draw"
  "os"
  "strconv"
  "github.com/nfnt/resize"
  "math"
)

func init() {
  // damn important or else At(), Bounds() functions will
  // caused memory pointer error!!
  image.RegisterFormat("jpeg", "jpeg", jpeg.Decode, jpeg.DecodeConfig)
  image.RegisterFormat("png", "png", png.Decode, png.DecodeConfig)
}

func make_image_tiles(basepath string,scale int,tile_size int,rescale_size int,rgbimage *image.RGBA) {
  bounds   := rgbimage.Bounds()
  fmt.Println(bounds)

  path := basepath + "/" + strconv.Itoa(scale)
  os.Mkdir(path,777);

  for cx := bounds.Min.X;cx < bounds.Max.X;cx += tile_size {

  os.Mkdir(path + "/" + strconv.Itoa(cx/tile_size),777);

   for cy := bounds.Min.Y;cy < bounds.Max.Y;cy += tile_size {
  
     // Grab tile from image
     fmt.Printf("Get tile %v %v %v %v\n",cx,cy,cx+tile_size,cy+tile_size)
     subimage := rgbimage.SubImage(image.Rectangle{image.Point{cx,cy},image.Point{cx+tile_size,cy+tile_size}})

     subbounds := subimage.Bounds()
     fmt.Println("subb: ", subbounds)
     x_delta := (subbounds.Max.X-subbounds.Min.X)
     y_delta := (subbounds.Max.Y-subbounds.Min.Y)
     fmt.Println("delta: ", x_delta," ",y_delta)
     if (x_delta < tile_size) ||
        (y_delta < tile_size) {

       newsubimage := image.NewRGBA(image.Rectangle{image.Point{0,0},image.Point{tile_size,tile_size}})
       draw.Draw(newsubimage,image.Rectangle{image.Point{0,0},image.Point{tile_size,tile_size}},subimage,subimage.Bounds().Min,draw.Src)
       subimage = newsubimage

     }
     fmt.Println("subdixed: ", subimage.Bounds())

     if tile_size != rescale_size {
      subimage = resize.Resize(uint(rescale_size),uint(rescale_size), subimage, resize.Lanczos3)
     }

     // Write the file to disk
     subfile, _ := os.Create(path + "/" + strconv.Itoa(cx/tile_size) + "/" + strconv.Itoa(cy/tile_size) + ".png")
     png.Encode(subfile, subimage) 
   }
  }
}

func main() {
  imgfile, err := os.Open(os.Args[1])

  tile_size := 256
  rescale_size := tile_size

  if err != nil {
    fmt.Println("file not found!")
    os.Exit(1)
  }

  defer imgfile.Close()

  img, _, _ := image.Decode(imgfile)

  rgbimage := img.(*image.RGBA)
  bounds   := rgbimage.Bounds()

  width  := bounds.Max.X - bounds.Min.X
  height := bounds.Max.Y - bounds.Max.Y

  // there's no int math.Max in golang
  mdim := math.Max(float64(width),float64(height))

  scale_max_f := math.Log2(mdim/float64(tile_size))+1
  scale_max   := int(scale_max_f)

  os.Mkdir("./tiles",777);

  c_tile_size := tile_size
  for scale := scale_max; scale >= 1; scale-- {
    fmt.Printf("tile size: %v\n",c_tile_size)
    make_image_tiles("./tiles",scale,int(c_tile_size),rescale_size,rgbimage);
    c_tile_size = c_tile_size*2
  }

}