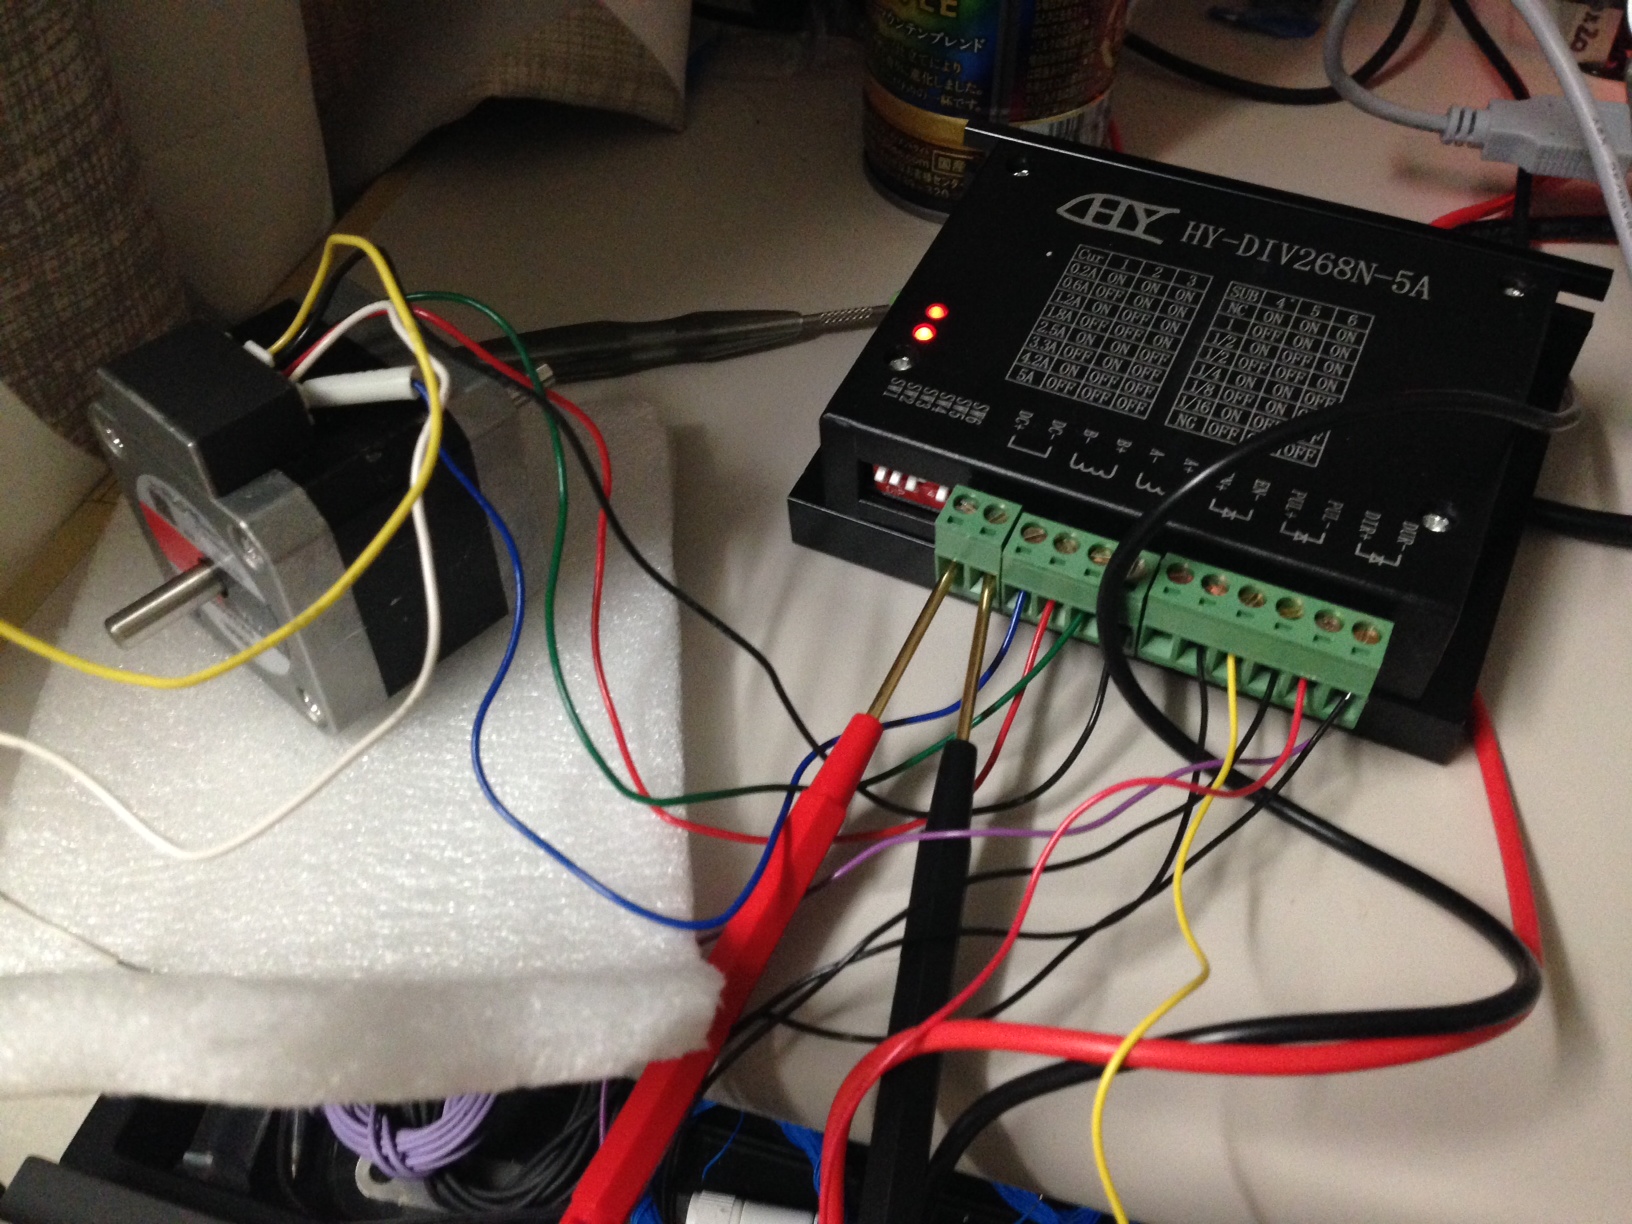
HY-DIV268N-5A Stepper driver with Arduino

I’ve previously posted about the HY-DIV268N-5A and shown how it can be driven with a function generator and how I used to in my Proxxon CNC Mill conversion.

Using the HY-DIV268N-5A with an Arduino is equally simple. You can use the HY-DIV268N-5A directly, or with the often supplied parallel driver board.

The image below show how the HY-DIV268N-5A should be connected, make sure all the black wires are connected to ground and that the stepper is connected correctly.

Make sure the lights on the HY-DIV268N-5A are correctly illuminated. They wont be if you don’t supply enough voltage/current. Refer to my previous post for specifications.

Once the stepper is correctly connected you should be able to drive the stepper with pulses from the Arduino. Make sure the Enable pin is grounded. And the grounds are common between the driver and the Arduino. All grounds in the system should be connected. Then simply send pulses from the Arduino to the PUL+ pin, pulling DIR+ high/low to change the direction. Use the normal digitalWrite function to do this.

Using kindlegen to make a Kindle book

These notes refer to the Linux version of kindlegen.

Using Kindlegen is pretty straight forward, it can process HTML files into mobi format reasonably painlessly, but I did run into a couple of small issues.

I used an HTML file with the following basic format:

<html>
<title>BOOKTITLE</title>
<link href="//maxcdn.bootstrapcdn.com/bootstrap/3.3.2/css/bootstrap.min.css" rel="stylesheet">
<meta name="cover" content="/home/user/fullpath/to/cover.png">
<body style="margin-top: 100px; margin-bottom: 100px; margin-right: 50px; margin-left: 50px;" >

<h2>Contents</h2>
<a href="#s1">section1</a><br>
<a href="#s2">section2</a><br>
<a href="#s3">section3</a><br>
<a href="#s4">Footnotes</a><br>

<h2 id="s1">section1</h2>
<p>BLAH BLAH BLAH BLAH <sup><a href="#fn1" id="r1">[1]</a></sup>

<h2 id="s4">Footnotes</h2>
<p id="fn1"><a href="#r1">[1]</a>Interesting stuff</p>

Which can then be processed with kindgen simply as:

kindlegen myfile.html

And a mobi file will be generated with the same name as the html file, and in the same directory. Initially I ran into issues processing the cover file and kept getting the error “Cover file not found”. Unlike all the over images in the html file, the meta tag pointing to the cover image has to be the full local path to the file, rather than relative to the html file.

It should also be noted that the CSS linked will be ignored by kindlegen, this makes it easier to process HTML files you’re also using elsewhere.

SEM (Scanning Electron Microscope) Notes

I’ve been looking at buying an SEM, possibly for shared use and mostly because I’ve seen a couple going very cheaply and having a microscope capable of 100000x magnification intrigues me.

This post will serve a a location for me to keep my notes on SEMs.

Sample/Operation issues

In general you want to minimize the acceleration voltage, to avoid damaging your sample. However this also results in a poorer resolution image. So there are trade offs to be made in acceleration voltage. The JOEL SEM Guide has extensive information on the issues involved. The figure below sums up the issues:

You can see how the applied voltage has effected image resolution in the image below:

You also have similar issues with probe current, minimizing probe current yields sharper images (higher resolution) but you lose sharpness (there’s more noise). High currents can also damage the sample.

The sample angle can also have a significant effect, causing edge effects at certain tilt angles:

Another issue that comes up is sample “charge-up”. If your sample is an insulator a charge can build up on the surface, which will result in poor image quality:

This can be countered against by using a lower voltage, or by coating the sample with a conductive layer (e.g. with a sputtering machine).

EDS/EDAX

Some SEMs come equipped with an EDS system (the most popular appears to be the EDAX). This is a X-ray spectroscopy method mostly used for biological samples. It allows the user to chemically characterize their sample.

The Maximum Subarray Problem

I was asked this in an interview sometime ago. The problem simply stated is “Find the contiguous subsequence in a sequence of numbers which has the largest sum.”. The problem was first presented in 1977, and a linear time solution was reported in 1984. Of course I was asked to solve it in the course of a ~30min interview. 🙂

The linear time solution is called Kadane’s Algorithm, you can read about it on wikipedia. The solution first simplifies the problem, by saying we’re only looking for positive sums. That is, we don’t care about the case where the maximum sum is negative. We can then solve the problem relatively easily but finding the maximum run to each position, if the current maximum subarray value every drops below zero we just discard it (because we’d never want to sum from a negative value, it would be better to sum from zero). Here’s a python implementation of this from wikipedia:

def max_subarray(A):
    max_ending_here = max_so_far = 0
    for x in A:
        max_ending_here = max(0, max_ending_here + x)
        max_so_far = max(max_so_far, max_ending_here)
    return max_so_far

If we now want to generalize this to the case where the maximum subarray is negative (i.e. everything in the array is negative). We can do that, rather than saying if we go below zero we want to discard the previous parts of the array, we say if the sub goes below the current value as follows:

def max_subarray(A):
    max_ending_here = max_so_far = A[0]
    for x in A[1:]:
        max_ending_here = max(x, max_ending_here + x)
        max_so_far = max(max_so_far, max_ending_here)
    return max_so_far

Here’s a solution in C++:

#include <iostream>
#include <vector>
#include <stdlib.h>

using namespace std;

int max_subarray(vector<int> &array) {

int max_ending_here = array[0];
int max_so_far = array[0];

for(int n=1;n<array.size();n++) {
if(array[n] < (max_ending_here+array[n])) max_ending_here = max_ending_here+array[n];
else max_ending_here = array[n];
if(max_so_far < max_ending_here) max_so_far = max_ending_here;
}

return max_so_far;
}

int main() {

vector<int> data;

srand(time(NULL));
for(int n=0;n<10;n++) data.push_back((int)(rand()%10)-5);
cout << "data: ";
for(int n=0;n<data.size();n++) cout << data[n] << " ";
cout << endl;

int maxsub = max_subarray(data);

cout << "Max subarray is: " << maxsub << endl;

}