SecurityTube, Wireless Lan Security Megaprimer notes: parts 1 to 4
These are my notes on Parts 1 to 4 of the security tube wireless security videos here.
I’m using Backtrack verison 5 R1 whereas Vivek is using version 4. The only different so far is that mdk is on the path, so I can just type “mdk” to launch it.
Part 1
This is the wireless device used in all the videos:
Alfa Networks AWUS036H USB Wifi device
* Integrated into Braktrack
* Allows for packet sniffing
* Allows for packet injection
* 1W output
Will also need a AP, two laptops. Some smartphones may be interesting.
Install Backtrack (tutorials use Backtrack 4R2).
Attached the USB Wifi device and connect to VirtualBox if you’re using that.
Part 2
0. Backtrack doesn’t startx, so type startx if you want it.
1. Bring up the wifi card:
ifconfig wlan0 up
2. You need to create a monitor mode interface for monitoring:
airmon-ng # without args shows cards
airmon-ng start wlan0 # creates monitor interface
iwconfig # check that the card is in monitor mode
3. Load Wireshark (at a command prompt type “wireshark”).
4. Start a capture, from the “Capture menu”: Capture->Interfaces->mon0 (start)
4.1 Note: Wireless card can only monitor one channel at a time.
4.2 Note: Different countries have different channels and allowed power levels.
5. You can force card on to specific channel for example:
iwconfig wlan0 channel 1
6. Some tools can hop between channels showing traffic, for example airodump:
airodump-ng --band bg mon0
Part 3: Beacon Frames
Three types of packets: Management, Control, Data (there are subtypes of these too)
You can find a LOT of information here: 802.11 specs: http://standards.ieee.org/about/get/802/802.11.html
Access points are configured with SSIDs. That’s a network name, used for discovery. SSID can be for one AP or multiple APs. To allow clients to find them access points broadcast “Beacon Frames”.
1. Capturing Beacon frames with wireshark:
ifconfig wlan0 up
airmon-ng start wlan0
wireshark&
2. Examine the beacon frame. Select a beacon frame in wireshark.
2.1 Look at Management frame header.
2.2 Note that there are “Fixed parameters” and “Tagged parameters”
2.3 “Fixed Parameters”: Look in “Capabilities Information”, it tells you if it’s an AP or not.
2.4 “Tagged Parameters”: note you can see supported rates and the device channel. Possibly encryption information.
3. Attackers can inject their own beacon frames! We’re going to show you how.
3.1 We’ll use MDK to create beacon frames. Type the following to get info on mdk:
mdk --help b # shows info about beacon flooding
To broadcast beacon frames, type the following:
mdk3 mon0 -b -n PWNEDSSID
You should be able to see the network PWNEDSSID on other devices!
Part 4: Dissecting AP-Client Connections
Note1: Vivek plays around a lot with wireshark filters in this video, some of it isn’t strictly required, but it gets you used to using filters.
Note2: Make *SURE* you are filtering to/from the correct MAC addresses. I found this partiuclarly important if you have a lot of Apple hardware around…
0. Setup an open access, access point.
1. We’re going to connect a smartphone or PC to this AP, so have a client ready.
2. Make sure wifi is off on the smartphone/PC.
3. Set the channel of the Backtrack laptop wifi card to the same channel as the open access point, as follows:
3.1 As before, use airodump-ng mon0 to display the channel the AP is on.
3.2 As before, use iwconfig wlan0 channel
4. Make a capture of the traffic using wireshark (as before).
5. Filter for traffic not to/from our access point and filter out beacon frames.
5.1 The filter will eventually read as (wlan.addr == ACCESSPOINTMAC) && !(wan.fc.type_subtype == 0x08)
5.2 You can build this filter by pointing and clicking in wireshark:
Open a beacon frame, under “802.11 Beacon frame” right click on “Source address”, select “apply as filter”->Selected
Edit the filter box change “wlan.sa” to “wlan.addr”.
Under “IEEE 802.11 Beacon frame” select “Type/Subtype”. Right click, select “apply as filter”->”and not selected”
6. Attach the client smartphone/laptop to the network.
7. Add another address to the filter. This is the client address.
7.1 remove the && !(wan.fc.type_subtype == 0x08) portion of the filter.
7.2 In the “IEEE 802.11” section of the packet select the MAC of the client and right click:
“apply as filter”->”and selected”
8. Remove the (wlan.addr == ACCESSPOINTMAC) part of the filter. Your filter should just read:
(wlan.addr == CLIENTMAC), where CLIENTMAC is the mac address of your smartphone/PC.
9. Take a look at the packet trace in wireshark.
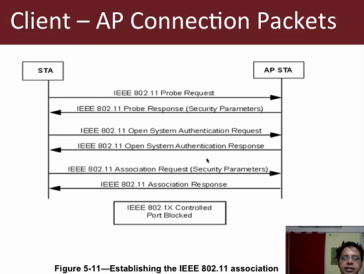
9.1 Find the first “Probe Request” from the smartphone/PC.
9.2 Note that it’s a Broadcast packet.
9.3 Note that below that packet you can see a “Probe Response” coming from your access point.
9.4 Client may also send out “Probe Requests” to networks previously connected to.
10. Add the access point mac to the filter. As before right click the access point address and select “apply as filter”->”add selected”.
Change wlan.sa to wlan.addr.
11. Scroll down a little, you should be able to find a packet labeled “Authentication” from your AP to the client.
11.1 Note that the Authentication packet from the client as “Authentication SEQ: 0x0001” and the reply has “SEQ: 0x0002”.
12. Now we see the association packets.
12.1 Note that the client sends an “Association Request”
12.2 Note that the AP replies with an “Association Response”
13. After that we should be able to see data packets, such as ARP requests etc.
14. Vivek makes some interesting observations about the packet exchange, and wireless state machine:

